Wednesday, December 2, 2015

Programming new Reiser panels (G3)

I think I've mentioned the 'panels' that Michael Reiser developed while he was in Michael Dickinson's lab. These are widely used, but programming them can be a bit difficult and tedious. (By program, I mean upload the firmware to the panels themselves, not simply changing the address, which can be done easily over serial.) Will Dickson at iorodeo.com recently wrote a great little collection of shell scripts to make this process easier.

You will need a panel controller box, the panels you want to program, and an avrisp mkII.

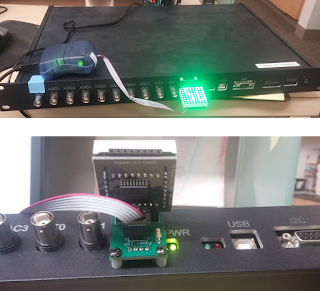
First, plug the mkII usb into your computer and the female header side into the six-pin header on the front of the controller box:


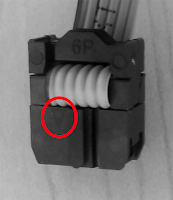
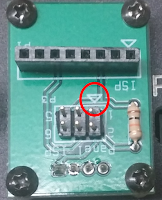
Make sure to align the small arrow on the avrisp mkII with the arrow on the header:


Next, plug a panel face-up into the female header:


Now, download and unzip the scripts from Will's bitbucket site. In a terminal, cd into the iorodeo-panels_prog_avrdude/program directory. Finally, run

./program_panel <address>


(The first time, this might require your password.)
Note <address> is the panel address you want to assign to the panel in HEX. That's right, you need to convert to hex from decimal. To do this conversion, I use an interactive python prompt and the following:

import numpy as np
np.set_printoptions(formatter={'int':lambda x:hex(int(x))})
print <address in decimal>


Friday, October 9, 2015

Fractal life

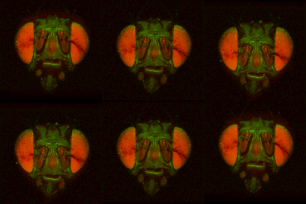
This week's special issue of Current Biology, especially Nicholas Butterfield's article on the Neoproterozoic, got me thinking about my favorite pre-Cambrian life form, Charnia. This organism is believed to have developed according to rigidly recursive rules, and I thought it would be fun to play with a terrific Python plotting library, pyqtgraph, in this context. I started with the discussion of recursion in this book. This animate gif is the result:


I think the result is kind of pretty. The (somewhat sloppy) code that produced the images is here:


Friday, September 11, 2015

Using BrainAligner to warp z-stacks of Drosophila brains

In my recent paper on central complex processing during flight, I used BrainAligner to register z-stacks of Drosophila brains to one another. Getting it to work took a little fiddling, which I'll record below.

To install, follow directions here.

Next, right-click brainaligner_linux_redhat_fedora_64bit and choose properties. Under the Permissions tab, click the "Allow executing file as program" checkbox.

In terminal, type
gedit ~/.bashrc

and add
export PATH="/home/$USER/<rest of path to directory>:$PATH"

at the end of the file to add <rest of path to directory> to your path.

It gave me the following error
"error while loading shared libraries: libtiff.so.3: cannot open shared object file: No such file or directory"
Based on this stackoverflow answer, I ran
sudo ln -s /usr/lib/x86_64-linux-gnu/libtiff.so.4 /usr/lib/x86_64-linux-gnu/libtiff.so.3
to get it to recognize libtiff.so.3
And it seems to work!

To work with multiple color channels, you have to go to image>type>RGB color to change a composite image to a 3 channel color image. BrainAligner will assume the first channel is the reference channel to use in the warping, unless you give it a different channel number as an argument.

After much testing, I found that the following command worked well:

 ./brainaligner_linux_redhat_fedora_64bit -t ./20150101/Z3_8b_c_b3.tif -s ./20150101/Z1_8b_c_b3.tif -o ./20150101/warpedZ1.tif -w 10 -B 341 -x 1 -z 1 -X 1 -Z 1

The file names of the image stacks remind me that after converting each z-stack to RGB color (image>type/RGB color in imageJ), I binned every three pixels. This resulted in stacks that were 341x341 pixels, and the x-y resolution was equal to the z resolution. BrainAligner worked in about 2 hours.

Definitely check the warped stack afterwards, because BrainAligner will fail if the initial two stacks are not very similar to begin with. (I was aligning two stack from the same animal before and after photoactivation, which was a relatively easy alignment problem.)

Using ImageJ to count cell bodies in photoactivatable GFP experiment

In the PNAS paper, I counted cell bodies that contained photoactivated GFP after photoactivating the fan-shaped body. To do this, I followed this procedure: Acquire z-stacks before and after photoactivation, then align the first stack to the second stack using brainAligner (instructions here).

Next, download and install the Cell Counter plugin for imageJ.

Open both z-stacks. Make sure they have the same dimensions. (If not, scale them.)
Go to Plugins>Cell Counter
initialize Cell Counter on the after-activation stack.
Make sure the Counter Window (after activation z-stack) has focus, then click Analyze>Tools>Sync Windows

Now you can go through and click cell bodies that are greener in the after-activation stack than the before-activation stack.


Tuesday, September 8, 2015

Functional divisions for visual processing in the central brain of flying Drosophila

My new paper is now available in the PNAS Early Edition! I don't want to give too much away, but it has something to do with the structure pictured below:

NINDS also published a blog post about the work!


Tuesday, July 28, 2015

Installation notes for Kinefly

Today I'm going to set up a computer to track average wing stroke envelopes of flies. This is useful because asymmetries in wing stroke amplitude indicate attempted turns by tethered flies, so measuring them gives us a quantitative metric of flight behavior. I'm going to be installing Steve Safarik's Kinefly, which is a ROS-based replacement for Andrew Straw's Strokelitude, both of which were developed in the Dickinson Lab. (Strokelitude is rapidly becoming obsolete.) Here is a screenshot of what Kinefly looks like:
Screenshot of wing amplitude tracking using Kinefly

I'll mostly follow Steve's instructions here, but make notes of any differences. To start off with, I installed 64-bit Ubuntu 14.04 LTS on a new hard drive.

Departing from Steve's instructions, I'll first install ROS Indigo, which is a newer version of ROS and will hopefully be supported for longer. I'll follow the directions here.

I'll be using a firewire (IEEE1394) camera in my rig, not a gigE (Ethernet) camera, so I'll skip the Camera Aravis installation (lines 29-35 of Steve's installation instructions). I also skipped lines 50-53. Instead I installed the ROS drivers for 1394 cameras:

cd catkin/src/
git clone https://github.com/ros-drivers/camera1394.git
cd ~/catkin
catkin_make

Now I'm going to download and install coriander to test that the camera is working:

sudo apt-get install coriander
Then I plugged the camera into the computer and ran
coriander
Under the Services tab, click Display and you should see a live image from the camera.

In line 90, I copied the 'polarization' rig instead of 'thadsrig' because that rig used a 1394 camera:
cp -R polarization yourrigname

We are almost done! Now just three lines of code that need to be changed because ROS indigo uses opencv2 instead of an earlier version (I think):

gedit ~/src.git/Kinefly/nodes/kinefly.py
and edit line 240 to be:
rosimg = self.cvbridge.cv2_to_imgmsg(imgInitial, 'passthrough') # used to be img = np.uint8(cv.GetMat(self.cvbridge.imgmsg_to_cv(rosimg, 'passthrough')))
line 619 to be
img = np.array(self.cvbridge.imgmsg_to_cv2(rosimg, 'passthrough')) # used to be img = np.uint8(cv.GetMat(self.cvbridge.imgmsg_to_cv(rosimg, 'passthrough')))
and line 769 to be
rosimgOutput = self.cvbridge.cv2_to_imgmsg(imgOutput, 'passthrough') # used to be rosimgOutput = self.cvbridge.cv_to_imgmsg(cv.fromarray(imgOutput), 'passthrough')


If you want to test Kinefly without the LED panels attached, you can edit the _main.launch file: 
gedit ~/src.git/Kinefly/launch/yourrigname/_main.launch 
Comment out the following three lines:
<include file= "$(find Kinefly)/launch/$(env RIG)/params_ledpanels.launch" ns="kinefly" />
<node name="ledpanels" pkg="ledpanels" type="ledpanels.py" />
<node name="flystate2ledpanels" pkg="Kinefly" type="flystate2ledpanels.py" ns="kinefly"  />
by inserting   <!-- before each and --> after each. Now test Kinefly by running this command:
roslaunch Kinefly main.launch
Don't forget to click the 'exit' button to close Kinefly--the red x doesn't work!

Saturday, January 31, 2015

Using pynrrd to read nrrd files into Python

Another in the series of posts about file types! This time, a quick note about importing .nrrd image stacks into Python. Download and unzip pynrrd from here. In a terminal, cd into the directory, and run

python setup.py install

In Python the usage is very straightforward:

import nrrd
frames, options = nrrd.read(fileName)


Thursday, January 29, 2015

Using PyLibTiff to read tiff files in Python

ImageJ can open and save .tiff image stacks with ease. Additionally, to use BrainAligner to register image stacks, it is useful to have the image stacks saved as .tiff files. (My post about BrainAligner is here.) Various Python libraries exist that can open .tiff files, but some of them cannot handle image stacks (3d arrays of pixels). I've started to use PyLibTiff to handle this file type in my Python scripts. In order to install it, just run

sudo apt-get install python-libtiff

at a terminal.

Update: This does not appear to work in Ubuntu 14.04. It results in installation of version 0.3.0, which I believe has been replaced by 0.4.0. You can download the newest version at https://pypi.python.org/pypi/libtiff/ then unpack it, cd to the directory, and run

sudo python setup.py install

For some reason you will need to move out of the downloaded directory in order to actually test it, though. Open a python interactive prompt and make sure that you can import it: from libtiff import TIFF
Below is a snippet of some code that I've been using to open a 2-channel (2-color) image stack and arrange the dimensions in a way that I find intuitive (x,y,z,color).


Thursday, January 8, 2015

Two important contributions

Are flies cool?


Are animated GIFs a waste of time?

Wednesday, January 7, 2015

Using pyLSM to read LSM files in Python

The good people at Janelia have provided the fly community with an enormous wealth of data in the form of confocal stacks of their GAL4 collection. There are many excellent open source tools to work with such image collections (e.g. imagej and fluorender), but reading the stacks directly into Python for automated analysis can be difficult. Below I'll describe my preferred method.

First, download the zipped PyLSM folder from here. (Linked to from this page.)

Next, unzip the folder, navigate inside it at a command prompt, and run

sudo python setup.py install

The website for this python module is http://www.freesbi.ch/en/pylsm and there is some documentation here.

I haven't tried out the gui yet, but here is a snippet of code that should open a Janelia stack.